Problem:
Users preference is to open all Sametime Meeting Rooms in the client. Customer does not allow mixed content in the browser (good thinking).
When user clicks on links to Meeting Servers that was setup with SSL, meaning the link is an https link instead of a http link Meeting Room is not opening in the client.
Cause(s):
1. Webapi is not enabled at all in the IBM Notes Client
2. Webapi on the Client is not SSL enabled
3. The login.jsp on the Meeting server can not handle request to the IBM Notes Client when accessed thru https
4. All of the above
I did all this in Windows so commands and packaging is different if you use eg. Linux, so don't hold that against me.
Probably this code can also be used on Linux but with different commands to check if it works, also I did an extended
version of the jar file that is only valid for Windows running in Administrative context.
I did this and tested it for IBM Notes client 9 only.
You can download code and textfiles here, please use the textfiles if you cut and paste because formatting on this site could otherwise give unpredictable results
Problem:
Users preference is to open all Sametime Meeting Rooms in the client.
When user clicks on links to Meeting Servers that was setup with SSL, meaning the link is an https link instead of a http link Meeting Room is not opening in the client.
Cause(s):
1. Webapi is not enabled at all in the IBM Notes Client
2. Webapi on the Client is not SSL enabled
3. The login.jsp on the Meeting server can not handle request to the IBM Notes Client when accessed thru https
4. All of the above
Solution(s):
1. Make sure that the following parameter is present in plugin_customization.ini (or distributed in some other way)
com.ibm.collaboration.realtime.webapi/startWebContainer=true
2. Use the Sametime SDK sample as a starting to develop your own jar file to include in the install package or distribute as an update
3. Change the content of login.jsp to meet your needs
4. Distribute the certificate file into the Trusted Root Certification Authorities store.
5. Do all of the above
Description(s):
1.
In my case 1. above was present and webapi was started in the client but was not listening on https only http.
The way this implemented is as follows:
http listens on port 59449
https listens on port 59669 (if enabled)
To see what is running use the following command:
netstat -an | findstr "59"
When the solution is working you should be able to see:
TCP 127.0.0.1:59449 0.0.0.0:0 LISTENING
TCP 127.0.0.1:59669 0.0.0.0:0 LISTENING
2.
The problem with doing 2. above is the following:
a. Install a Development environment
b. Develop something that can be installed inside a package and also thru provisioning to both single and multiuser clients
c. Solve the problem with installing unsigned code
d. Solve the problem with SSL certifikates on a local machine
e. Decide which part of IBM that has the correct answer to how a local machine is defined in the context of Sametime SDK, IBM Connections integration, Sametime Meeting server team.
The adress to a local url could basically be 127.0.0.1 or localhost
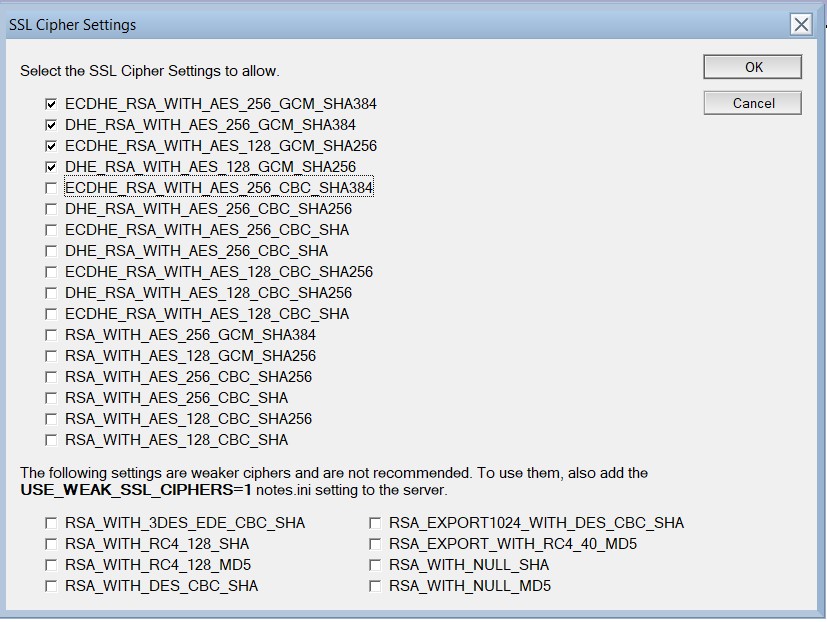
f. Poodle meaning TLS must be on otherwise browser will not work
g. Include the jar file inside the windows install package for Sametime Embedded (I guess this can be done in a DEB package as well), description not included here.
When all this is done login.jsp (3. above) must be changed to reflect decisions made earlier
For a. I downloaded and installed eclipse-jee-luna-R-win32, I got help from my developer friend @Tobias Gruvfält to include the sample code provided by the Sametime SDK in a new project
For c. I also tried to sign my jar file, but when I tried to install it was always failing (documentation on this is really poor I think), instead I decided to make changes to
plugin_customization.ini by changing the following 3 lines before installing:
com.ibm.rcp.security.update/EXPIRED_SIGNATURE_POLICY=ALLOW
com.ibm.rcp.security.update/UNSIGNED_PLUGIN_POLICY=ALLOW
com.ibm.rcp.security.update/UNTRUSTED_SIGNATURE_POLICY=ALLOW
For d. I created a keystore and a truststore valid for localhost (that I decided on e.), because SDK people and Connections people used localhost
Later on I needed f. and found documentation on how to disable SSLv3 and enable TLS
After that I made changes to certificate files and ssl config files as well as handlers to make sure that b. above was met.
For g. I used sametime.embedded.addon.win32_20141030-0523 (but other distributions can be used) and unzipped the zip file and added my jar file to the features catalog
(all jar files and certificate files as well as text to include in deploy is here ->webapissl-2)
Added 3 lines to site.xml:
<feature id="com.ibm.collaboration.realtime.webapi.ssl.feature" patch="false" url="features/com.ibm.collaboration.realtime.webapi.ssl.feature_9.0.0.jar" version="9.0.0">
<category name="sametime" />
</feature>
I added it just below the definiton of com.ibm.collaboration.realtime.webapi.feature
And also added lines to the following 3 files located in the deploy catalog:
x. plugin_customization.ini
# Trying to fix the problem with signing for this addon
com.ibm.collaboration.realtime.webapi/startWebContainer=true
com.ibm.rcp.security.update/EXPIRED_SIGNATURE_POLICY=ALLOW
com.ibm.rcp.security.update/UNSIGNED_PLUGIN_POLICY=ALLOW
com.ibm.rcp.security.update/UNTRUSTED_SIGNATURE_POLICY=ALLOW
at the bottom of the file
y. install.addon.xml
<feature action="install" download-size="236" id="com.ibm.collaboration.realtime.webapi.ssl.feature" match="compatible" mergeaction="add" shared="true" size="251" url="jar:${installer.root}/sametime.embedded.addon.win32.20141030-0523.zip!/" version="9.0.0"/>
just below com.ibm.collaboration.realtime.webapi.feature
z. uninstall.addon.xml
<feature action="uninstall" download-size="236" id="com.ibm.collaboration.realtime.webapi.ssl.feature" match="compatible" mergeaction="add" shared="true" size="251" url="jar:${installer.root}/sametime.embedded.addon.win32.20141030-0523.zip!/" version="9.0.0"/>
just below com.ibm.collaboration.realtime.webapi.feature
Remember to zip the features and deploy catalogs together with site.xml to a zip file with the same name as the old zip you earlier unzipped and replace the old zip file with the new one.
3.
If I remember correctly the original line inside login.jsp on the Meeting Server (please refer to your own environment on where to find it) is as follows:
window.installedClientWebApiUrl = "https://127.0.0.1:59449/stwebapi";
I changed that to the following:
window.installedClientWebApiUrl = (("http:" == document.location.protocol) ? "https://localhost:59449/stwebapi" : "https://localhost:59669/stwebapi");
4.
Talk to your Administrators and make them distribute the included localhosttrustedroot.der to all clients and put it in Trusted Root Certification Authorities
this will work for both IE and Chrome in Windows but for FF you need to make an exception by actually accessing the local site accepting the exception localhost:59669
you can use this url in FF to do it:
https://localhost:59669/stwebapi/listservices
I also made a second jarfile that included the installation of the certfile as root in Windows and that must be run in the context of an Administrator on the other hand
the installation of the total package should run in Administrative context
This version has only been tested on a development machine and also it should not be used if you use provisioning (updatesite) as this always runs in user context.
Catalogs included in the zipfile available for download is as follows ->webapissl-2:
1. "nocertificateinstall" this is the catalog where the jarfile to use for both icluding in package and update site that is also tested on customer site, certificate file for distribution also.
2. "withcertificateinstallwindows" this is the not so tested version where installation of the certfile is included in the package, please read above before using.
3. "webapissl.txt" same content as this article use this when do cut and paste
4. "nocertificateinstallworkspace1-2" source code (eclipse EE) for 1.
5. "withcertificateinstallwindowsworkspace2-2" source code (eclipse EE) for 2.
6. "com.ibm.collaboration.realtime.webapi.ssl.updateSite.zip" sample of zip file to use for provisioning based on 1. of course
The End
5
MAR
2015
Share